Don & Paul are a very nice couple that I met a few years ago after I had donated a custom spray paint stencil piece to a local silent auction. Basically, I described how I would take their favourite memory [aka photograph] and turn it into an original work of art on canvas. Although they didn't really understand what all that entailed, they liked the idea of owning an original piece of art based on their own memories and experiences. I mean really, who wouldn't want that?! So, they bid and they bid and they bid again until the auction was over and they had won. They were so happy with the final result that they commissioned me to do another one. At first I was really excited and then I remembered that they both sport designer glasses and stylish facial hair... Two things that are very difficult to depict with stencils. The only thing more difficult then rendering glasses or facial hair with cardboard, a knife and spray paint is painting a realistic background based on a landmark. You see, what is cool about Don & Paul is that they love the arts and they love to travel. They truly want to see and experience the whole world. They take great time and pride in choosing the perfect photograph that truly captures them and a very specific moment in time. So, they choose a picture of them in front of the Great Wall of China [GWOC]. When they first brought the project to me they kind of mentioned that would most likely be the picture they would choose. So even before seeing the photo I was scared. Once they emailed the actual photo to me I was really really really scared. I knew that I had to keep the piece as photo realistic as possible. This was a challenge that I'd never faced on this scale before. The scope of the project was so big that I knew that I couldn't take it on all at once. I'd have to split it up. Thanks to Don & Paul, this is why the way that I paint would forever change. They weren't in a rush for the piece - thank goodness - so I literally had months to get it done and so I really took advantage of that time. The overall breadth and scope and detail of the image made me really plan out my approach. I took about a month of studying the image and writing notes and brainstorming techniques before I committed to a Plan of Attack [POA]. I decided that I would divide the image into two parts: Don & Paul and the GWOC. This image really lent itself to that approach as Don & Paul were in the foreground while the GWOC was in the background. I knew that this method of separating the image would lend itself to the most accurate and detailed stencils possible as I could focus on one particular portion of the image rather than the overall image. I like my spray paint and stencil work to be as genuine, pure and authentic as possible. I don't want to have to add hand painted details and fill in lines to complete the piece, I want the viewer to know that they're looking at a work that was done with stencils and spray paint, but at the same time I want the image to be photo realistic. Don & Paul were always curious about my process so I wanted to break it down for them. In fact, I'd always wanted to write a detailed account of my process and now I have the perfect excuse to do so. It's hard to understand what cutting a stencil entails until you've done it yourself or seen someone else do it. I've numbered the steps to correspond with an image. Although the image and subject matter for each project is different my process remains relatively the same with each piece. Obviously, as with anything, the more that you do it the more your process evolves and the better that you get at it. You find better solutions and easier ways to solve problems. You're constantly adapting. However, the basic skills and actions remain in place. They just become refined.
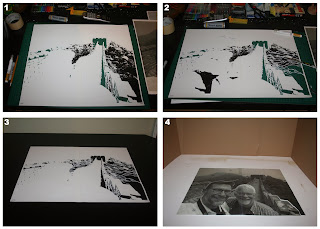
[1] First I decide how many layers I want to do - generally sticking between 4-6 layers. I start by scanning the photo and trying to pull out all of the individual details. I also do lots of hand drawing to turn the image into a stencil. I like my stencils to be as organic and soft as possible and this is difficult when you consider the limitations. I'm literally "drawing" on a piece of heavy weight paper with a knife. I've tried plastic but I find paper more forgiving and more organic and more affordable. For me, it seems more practical. So this image shows me cutting out the stencil of the final detail layer for the background.
[2] This photo shows more of the image being cut away. If you compare the far right side of image 1 with image 2 you can see that I've started to draw into the image to make the stencil. This adds both detail and character to the image while preventing it from falling through.
[3] This is the completed final detail stencil. The white is the cardboard with the black being the area that is cut out. Eventually the cut out area will be meticulously filled in with different layers and colours and shades of spray paint.
[4] This image shows the original photograph. I've blown it up to the size of the canvas (16" x 20"). Here, I am looking at the picture in terms of basic shapes and colours. I'm blocking out the colour for all of the layers to come, basically turning the picture into a puzzle. I cut the image into pieces to make very simple stencils that I'll be able to fill in with colour. If you look closely you can see the image divided into separate pieces that include Don & Paul, the GWOC, the mountains and the sky.
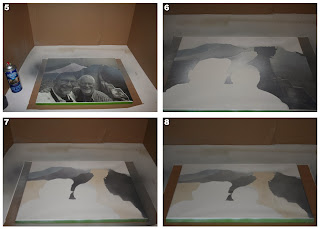
[5] Now I've started to paint the canvas. I've FrogTapped the edges of the canvas. FrogTape gives a nice clean seal and comes off quite easily, like nothing else that I've found on the market thus far. Using spray glue, I've lightly tacked the pieces onto the canvas. A light coating of spray glue keeps the stencil in place without leaving a gluey sticky mess behind. Here, I've started to fill in the mountains whilst being mindful to lay down the paint in a very layered and textural manner. I want the painting to reflect the reality of the image as closely as possible.
[6] Continuing to lay down the blocks of colour one by one by one...
[7] All the initial colour has been applied to the canvas. You can see that even though these are just flat layers of colour, they are anything but... I've paid close attention to details to ensure that these areas of colour are bold and vibrant and account for texture and shade and shadow.
[8] The first layer of detail for the background has been painted. It is very light and just adds a very basic tone and definition to build the image off of.
[9] The second layer of detail for the background has been painted. It is much darker then the first. You can see everything start to come together. In this layer, perspective and detail start to become quite evident.
[10] I've positioned the final background layer on to the canvas and am ready to spray the final layer. Direct contact, correct registration (so all of the layers line up properly) and a light layer of spray glue are all very important when this - and any stencil for that matter - is about to be painted onto any material. In this case, it happens to be a canvas.
[11] Here's the background with the first layer painted.
[12] I've blocked out the silhouette of Don & Paul so that I can do some shading and blending of the entire background.
[13] I've started adding some shading to the background.
[14] This is the finished background. You can see that the foreground is completely blank. If you look around the silhouette, up to the sky and to the bushes and hills to the right, you can see evidence of the shading and blending that I did with spray paint.
[15] With the background now completed, I'm free to move on to Don & Paul. The act of physically separating the painting into two parts will really make Don & Paul stand out and really jump into the foreground. The first layer is just basic colour. I've started off with something really warm so that once I start layering the cooler colours on top of it this bottom layer will really shine through the other layers and warm up the entire piece.
[16] This is the first layer of detail. In this image you can actually see the stencil used. Here, basic shapes and light and dark areas start to form.
[17] Now that the second layer of detail has been added the image really starts to come together.
[18] The final stencil has been added. At this point the piece is basically done.
[19] [20] Here is a side by side comparison of the finished painting and the original photograph. You can really see how all of the different layers come into play to create the painting. I really like how I was able to capture the tone, lighting and perspective of the original photo in my painting.

.jpg)
.jpg)
.jpg)


No comments:
Post a Comment